How to Handle Water Damage on Ceilings in Nanaimo

Water damage ceiling and walls is a common problem that many homeowners face, and it can be quite stressful. If your walls or ceilings have been affected by water damage, it’s essential to take action immediately. Excess moisture can cause extensive damage to your home, including mould and mildew growth, wood rot, and structural issues. By understanding what causes water damage, how to spot it, and how to repair it, you can protect your home from further damage and prevent costly repairs.

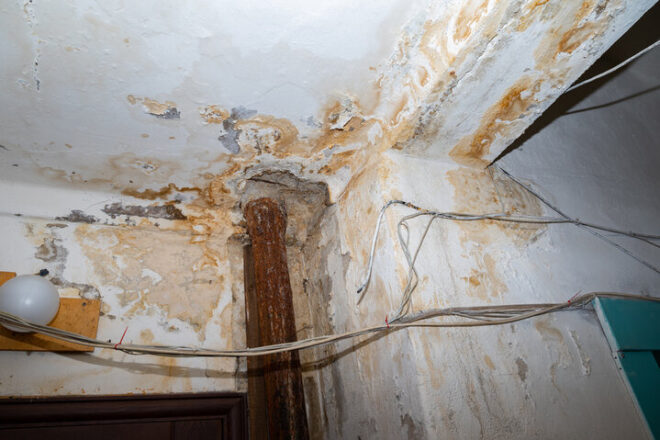
Water damage to ceiling causes peeling, bubbling, discolouration, and more.
There are several possible causes of water damage to walls and ceilings. Leaking pipes, overflowing sinks or bathtubs, and heavy rains can lead to damage. Even a small water leak that may not seem like a big deal can impact your home’s structural integrity if left unchecked.
Other Causes of Water Damage on Walls and Ceilings
Excess moisture can also cause water damage. Condensation, for example, from high humidity or steam from cooking or bathing, increases moisture. Sometimes, water damage may result from a faulty appliance, such as a dishwasher or washing machine. If you see water spots on your walls or ceilings, the drywall is likely saturated with water. Once the drywall is saturated, it can quickly deteriorate and may even need to be replaced.
Water damage can also cause wood rot in your walls and ceilings, leading to structural damage and requiring extensive repairs.
Signs to Look For
Many warning signs can alert you to hidden water leaks or water damage. Though each circumstance is different, knowing what to look for is essential to avoid more significant damage and expensive repair costs. If you notice any of the following common signs of water damage, you may need to seek out water-damage professionals:
- Peeling, flaking, or bubbling paint
- Warped walls
- Mould or mildew growth
- Stains on the ceiling or walls
- Wet patches on the walls or ceilings
- Condensation on windows or walls
- Musty odours
- Waterage leak or dripping water
- Unexplained increase in your water bill
How to Dry Out Damp Walls
The quicker you can address the water damage, the better you and your home will be. You should contact a professional company to complete the mitigation and restoration process. Doing so ensures the walls are dry before further repair, painting, or refinishing. If you choose to handle a small amount of water damage by yourself, however, here are some tips:
- After stopping the water source, remove paintings and other objects from the wall.
- Follow up by removing mouldings, baseboards, and wallpaper.
- Open windows and doors to help speed up the drying process.
- Use fans to move air around the damp walls. Dehumidifiers can also help remove moisture from the air and walls.

Dehumidifiers can help to eliminate moisture in the air to decrease the chance of mould growth.
How Restoration Professionals Dry Damp Walls After Water Damage
In the event of large-scale water damage, it’s best to contact experts with the right equipment and expertise to restore your home. They will determine the extent of the water seepage using various water damage restoration tools. One choice is a non-invasive moisture meter. This meter uses radio waves to test for water without putting holes in the wall.
Another professional instrument is an infrared imaging (IR) camera. Since the evaporation from wet walls makes them cooler than dry walls, the IR camera can find water in walls and will do so without requiring holes or another invasive technique to the wall.
These tools are essential because water damage can also affect interior walls. Once the professionals identify wet walls, they use specialized drying equipment.
If Walls Aren’t Insulated
In this scenario, the restoration expert can dry wet walls without destroying the baseboard. High-capacity air movers are employed every 10 to 14 feet along the wall. These air movers draw moisture off the wall’s surface, evaporating it quickly.
The restoration expert will install a low-grain refrigerant dehumidifier near the affected area. Depending on the moisture levels, one or more will be needed. This advanced drying equipment reduces the humidity levels to help with drying and prevent mould growth.
More Complicated Water Damage Cases
When appropriate, the restoration professional will install an inner-wall drying system by putting small holes above the sill plate and forcing air into the wall cavity. Studies have shown that this solution is the best and fastest way to dry water-damaged walls.
Additionally, the drying plan changes if there’s a moisture barrier on the outside or inside the wall. Moisture barriers are coatings or materials that inhibit the spread of moisture from the wall material.
Most latex paints are porous and don’t make up a barrier, but glossy paints may create one. Enamel paint or vinyl wall coverings create a complete barrier. Technicians must perforate or remove the barrier to allow moisture to escape and the walls to dry thoroughly. If there’s plastic or foil on the inside of the wall, then technicians will need to remove the wall. That’s because drying will not occur properly, and mould can develop in such situations.
If Walls Are Insulated
If fiberglass insulation with paper backing is present, an inner-wall drying system can be used, as described above. However, it can’t be dried successfully if the insulation is foil-backed fiberglass, blown-in cellulose, or Styrofoam.
In those cases, removing the damaged portion of the wall and the insulation is necessary to allow rapid drying and prevent mould growth.
Regardless of the procedures used by the restoration professional, homeowners should know that the equipment must operate continuously throughout the drying process.
Monitoring the Drying Phase
Finally, restoration professionals will monitor the drying status daily. This ensures the equipment is operating correctly during the drying process. Monitoring includes moisture measurements to determine when the materials will successfully dry. Material dryness is measured against similar unaffected contents in that structure. When dryness levels are equal, the drying is finished, and the equipment is removed.

Noticing Signs of Water Damage Ceiling or Walls? PuroClean Restoration of Nanaimo Can Address the Problem!
If your property has suffered from any kind of water damage ceiling or walls, it is important that you take immediate action to minimize the damage and safeguard your property. The first thing you should do is contact PuroClean Restoration of Nanaimo. We provide top-notch water damage remediation and restoration services. We are available 24/7 to assist you in case of a water damage emergency. Give us a call at (778) 906-0911 us so we can offer you peace of mind!


